Thursday, February 2, 2012

Toddler back pack. Now she can haul her own junk around!

Now that Cyrilla is getting bigger she's getting much stronger and I've often thought "she could really carry a lot of things around for me" and as my due date approaches and I'm thinking about all the great stuff I'm going to be hauling around for the new baby (note sarcasm), I figured it was time for Cyrilla to start doing her part... and also because my diaper bag simply is not big enough for two kids! So I set out to make Cyrilla her own back pack. I tried finding one at the thrift store down the road, but had no such luck, so after searching online I found a great tutorial that I knew would be easy to follow and went for it! The results were better than I'd hoped. There are a few things I'd do differently, and I did make some of my own adjustments to the process, but over all I stuck to the plan and Cyrilla now has her own pack to haul her own junk around in! She seems to like it and so far we've gotten lots of compliments... although a few people have asked her if she's going to school (and not jokingly) and I have to sigh and think "my poor giant kid will be getting this her whole life... people thinking she's older than she is. Pretty sure no kid under the age of two goes to school..."

Here is the original link to the back pack tutorial I followed. It has great instructions and easy to follow pictures, which I love. It also is simple and doesn't require too much sewing skill like some of the back pack tutorials I came across. 

Cyrilla's back pack ready to go


With mine I added an outside pocket instead of a decal so that I could have Cyrilla's sippy cups and snacks accessable without having to open the bag. I added elastic to the top of the pocket, and while it does a nice job of keeping things in place it does cause the bag to pucker a bit in the center. I also sewed a seam down the center of the pocket so it was two little pockets instead of one big one I added a button and elastic hook so that the pack would stay closed but also be flexible for when it was empty or very full.


I used a very heavy wool material that I had on hand from a thrift store ages ago. It was the perfect weight for a bag like this. I also top stitched the entire bag to give it more structure, which make it look really crisp.

The back. Two different button settings for adjustability.


The inside/liner
The liner turned out to be a bit bigger than it needed to be, so again I'd cut that down by a half inch or more next time I do a bag.

Over all a success! I'd recommend trying this one out and thanks again Kalleen for the great tutorial!

Wednesday, February 1, 2012

Diaper bag for my little girl's baby doll

So as many know I am in count down mode until baby number two comes, which means that A) I need to get all craft projects for Cyrilla's birthday done before March and B) I need a major distraction and crafting has been it!
I knew I wanted to make some awesome things to give my little girl for her 2nd birthday and came up with some good ideas, and after getting more input from searching the web and Pintrest, my good ideas became really great ideas. Here is one of those great ideas. A diaper bag for Cyrilla to use for her baby doll. Not only is it a diaper bag, but it is stocked full of goodies from a wipes case filled with wipes, to diapers, burp cloths, a bib and changing pad. I figure this gift will do double duty as fun for Cyrilla but also helpful for those moments when Mom needs to deal with her own baby and Cyrilla can play right along side with her baby!

I will do my best to explain the materials I used and process in making each item on the list as we go through the pictures.


The diaper bag
I simply cut out two equal size pieces of fabric for the front and back and then two additional  pieces of the same size fabric for the sides (making sure they were the same height as the front and back pieces and one bottom strip that is the same width as the side pieces and length of the front and back pieces. I sewed them all together and then top stitched the bag. The handles were also equal size pieces sewn into tubes, reversed and top stitched. 

The inside
I made a liner for the bag, using the same measurements as the outside bag, but if I were to do it again I'd decrease the measurements by a half inch or more as my liners always turn out too big. I also sewed a pocket to the right side of the liner before sewing the liner together (same as when sewing the outside of the bag.)


The goodies
Wipes case with wipes, Bib, Burp Cloths, Diapers, and Change pad (I did not make the change pad as I had an extra small one on hand) 

To make the diapers I used some extra fleece I had on hand as I didn't want to have to do too much tedious sewing and fleece won't fray (I know, I know, it's quite a wild pattern!). I simply took the doll they were going to be put on and cut out a paper pattern that would fit her and started cutting away at the fleece! I added velcro closures so that they would stay on. Honestly I'd hoped I could just use the hook part of the velcro and that it would adhere to the fleece on it's own, but it didn't so I had to add the softer part of the velcro too.

Baby doll diaper


The burp cloths were by far the easiest to make. It's simply one piece of pretty fabric and one piece of flannel, right sides sewn together, flipped right side out and then top stitched!


Baby Doll Burp Cloth

The bib was also pretty easy, again I made a pattern and tested it on the doll first, then cut equal parts of the same fabric, sewed it together right sides in, flipped it right side out and top stitched. I added velcro closures to the top instead of a snap because I thought it would be easier for my two year old to handle.

Baby Doll Bib

I got the idea for the wipes case from this blog, where there is also a tutorial: http://2littlehooligans.blogspot.com/2011/02/embrace-camera-baby-doll-accessories.html

Her diapers certainly put mine to shame, but I really did not want to do that kind of work! Also instead of using fleece wipes I cut up an old white t-shirt of my husbands and made several wipes. I love them because they are white like a real wipe, and the jersey fabric won't fray.


Wipes case for Baby Doll


And that's it! There is also enough space in her diaper bag to add the little accessories that came with the doll, like a bottle, pacifier, etc. I'm thinking this will be a big hit, but I guess I'll have to wait two months to find out!

Thursday, January 19, 2012

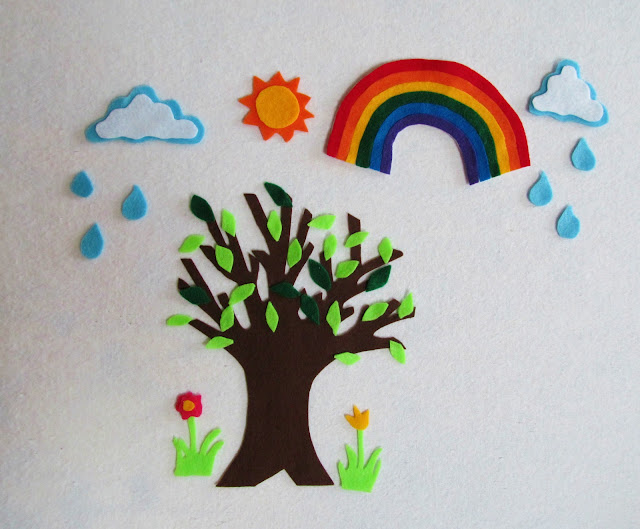
Seasons: Felt Tree

Well here it is, finally finished as promised, the seasons felt tree! This project was probably the easiest of all the felt projects I've done for Cyrilla's birthday. Other than the tree and the rainbow I didn't have to bother with creating any stencils for the other smaller pieces, which makes things go WAY faster.
If you're looking to recreate this some tips are:

  • Draw out your tree first and create a stencil (on paper or card stock) instead of trying to free hand it, you'll save yourself a lot of felt that way :) 
  • Make your leaves simple. The oval shape is so easy to do and you'll be doing tons of them. I thought about trying for a maple leaf look, but that wouldn't be worth my time.
  • Because your creating a nature scene things don't have to be perfectly uniform, as they aren't in real life, so don't stress about everything looking exactly the same.
  • I created a stencil for the rainbow by cutting out a large rainbow size piece of card stock and then I cut that in half (in the shape of the arch of the rainbow) and then each half into arched thirds (there are six colors). I then labeled each strip as to what color it needs to be (to avoid mistakes and confusion) and cut them out of their prospective colors. I then put the pieces onto a larger piece of white felt and lined them up as a rainbow should look and glued them on one by one to the white felt (I peeled half of a color strip back, glued, pressed and then did the other side so that I didn't have to fiddle with trying to reposition an entire strip and the rainbow stayed intact the whole time.) I then cut the rainbow out of the white felt and trimmed the bottoms to make it look uniform.
Well without further ado here is the Seasons Felt Tree:

Spring

Summer

Fall

Winter


Friday, January 13, 2012

Felt Board Awesomeness

Before Cyrilla was born I got crafty and made a felt board for her bedroom, to hang over her changing table. I imagined myself writing out sweet little messages on a regular basis... but yeah... that did not happen. The only thing I had made for the board was the alphabet and a few lame shapes. A long time ago I took it down for Cyrilla to play with, but she did not get the concept and I considered it a fail. But lately... lately Cyrilla has been really excited about the board. She even knows most of the letters and can put them on the board herself! So I thought I should make some more things for her to play with on the board and give them to her for her upcoming birthday! Here are two of the three things I planned to make. The first is all the pieces to the story The Very Hungry Caterpillar. Cyrilla had not even read the book before, but I borrowed it from a friend to get an idea for my felts and luckily it's been a hit! The second is a felt dress up doll set. Much like a paper doll, but less rip-able. Here is what I was able to come up with for these two ideas:

(First I should talk about how I made the board. Basically I had a big piece of white flannel on hand and I took an old picture frame I had on hand that was not going to be used. I took the glass out of the frame and stretched the flannel over it, tapping/securing it to the cardboard on the back. I then put the frame back together and volia, instant flannel board!)

Here's my The Very Hungry Caterpillar flannel/felt board set:


Most of my inspiration came from Googling "felt board Very Hungry Caterpillar" and then just looking at the images. It's amazing what's out there!  


Next I decided to do some felt "paper dolls". I was really pumped about this one because I got an amazing template from this blog:
 http://racheldenbow.blogspot.com/2010/12/dress-up-felt-board-tutorial-and.html

I actually got so excited making these dolls and clothes that it would take me a long time to fall asleep at night because I'd just dream up more and more dresses I could make, but I think I've done enough... I mean, she likely won't even get the idea of this set until a bit later, but man oh man was it fun to make! 

My dress up doll fashionista felt set:


Next I plan on doing a big tree and working on all the seasons. I'll be sure to post that one too when it's done. The hardest part of all of this: waiting until April to give them to my little girl! Momma wants to play!!!